Wednesday, September 14, 2016

Step by step Configuration of SharePoint Server 2016


 Step by step Configuring SharePoint Server 2016

1. Run SharePoint Products Configuration Wizard


Run configuration wizard

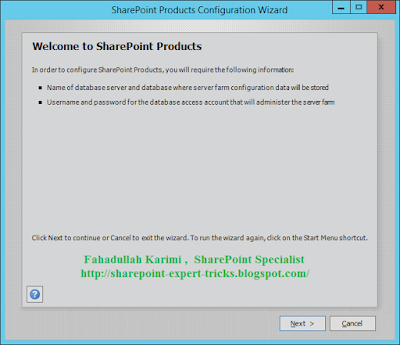
2. On "Welcome to SharePoint Products" screen. Click Next Button

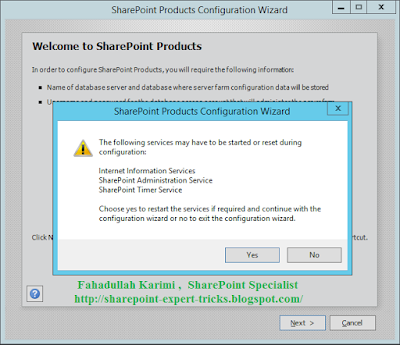
3. Click yes for products configuration wizard restart services


Restart services Confirmation

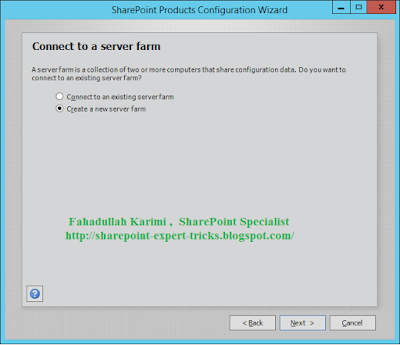
4. On Connect to a server farm, choose Create a new server farm.


Create New farm

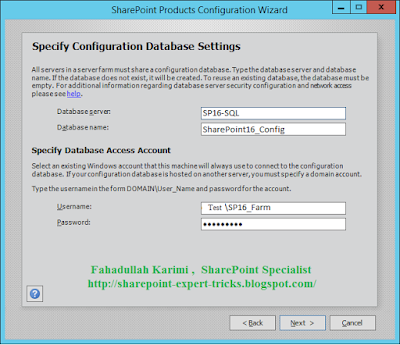
5. Enter the Database Server, Database Name and your database access credentials.


Database settings

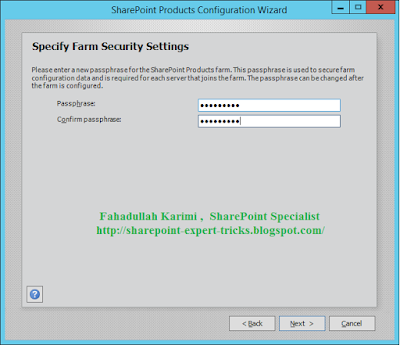
6. On the Specify Farm Security Settings screen, provide the password to secure the configuration data.


Passphrase

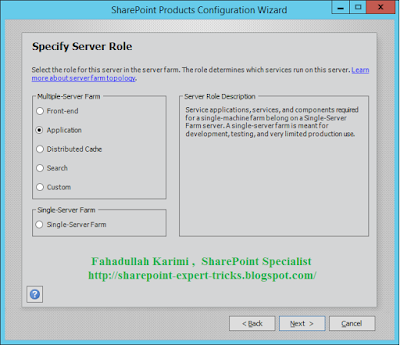
7. Specify Server Role. 


Specify Server Role

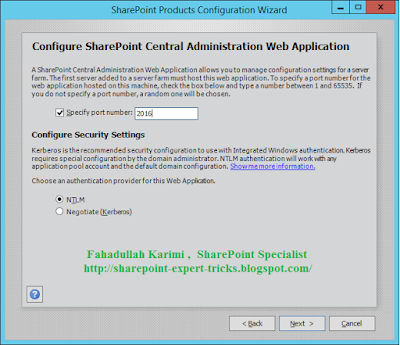
8.   Specify Central Administration Portal port, default Authentication provider: NTLM

 And Click Next


Central Administration Port


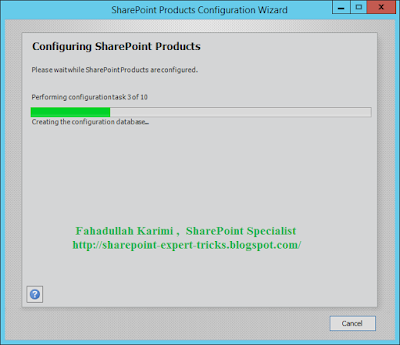
9. Wait for complete the Configuration.


Configuring

10. After completed, configuration wizard the verify screen. If you want to change any setting then click Back Button. Click Next to proceed.


verify screen

11. After Configuration successful page. Click on "Finish" to complete installation process.
  
Configuration successful

12. After click "Finish" button, Initial Farm Configuration Wizard page in SharePoint 2016 Central Administration site.
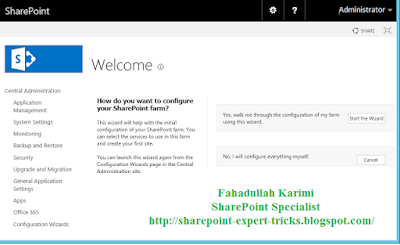
                 Initial Configuration wizard


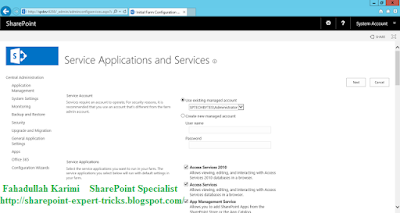
13. Provide service account and service applications.


Service Account

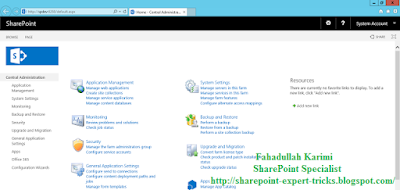
14. After the configuration is completed, page will be redirected to the Central Administration site.


Central Administration


Thank you very much

          Fahadullah Karimi

         SharePoint Specialist

Step by step installation of SharePoint Server 2016 SharePoint 2016 Vs SharePoint 2013 Vs SharePoint 2010

Step by step installation of SharePoint Server 2016


               Step by step installation of SharePoint Server 2016


1. Download SharePoint Server 2016

   https://www.microsoft.com/en-us/download/details.aspx?id=51493 

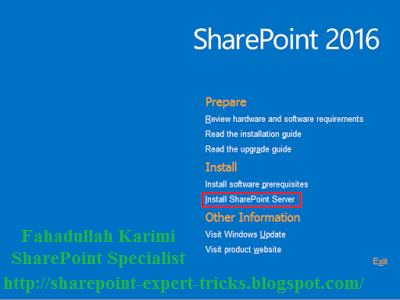
2.  Run the splash.hta file and click on "Install SharePoint Server" link.


Splash screen


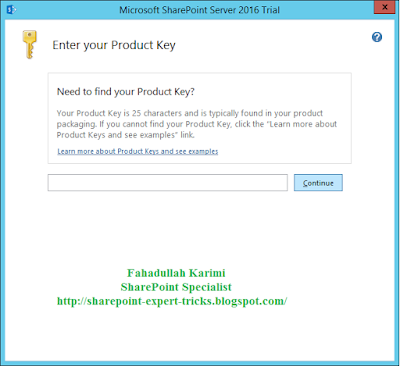
3. The SharePoint Server 2016 setup wizard is launched. You will Prompted to enter your Product Key. Trial product key: NQGJR-63HC8-XCRQH-MYVCH-3J3QR


Product Key


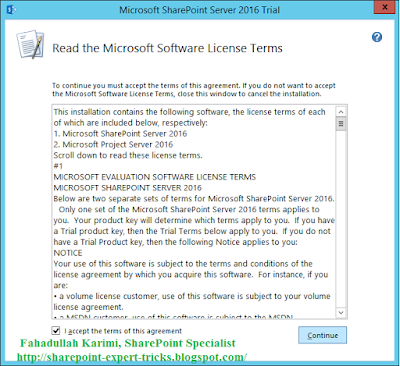
4. Read and Accept the license terms, check Check Box, Click on Continue  


Accept license Aagreement


 5. On the Choose a file location page, accept the default settings and click Install Now.


File location


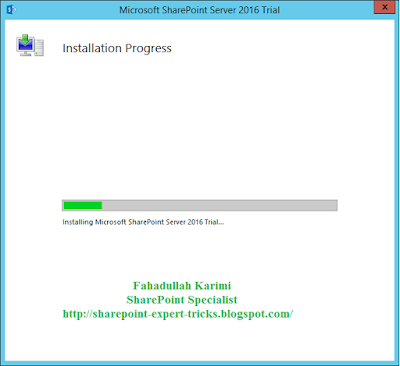
 6. Installation Progress, It will take a while to complete


Installation Progress


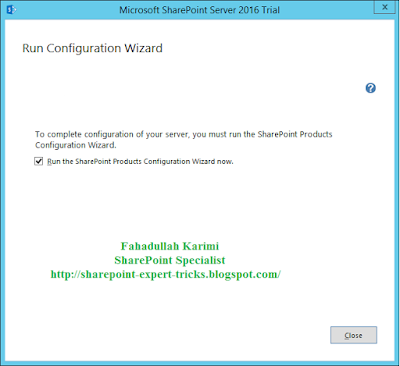
7. After all the components are installed, click on Close, to run Wizard. If you do not want to run you can run from start menu later.


Run Configuration wizard


Thank you very much

          Fahadullah Karimi

         SharePoint Specialist

Install Online/Offline prerequisites for SharePoint Server 2016 Step by step Configuration of SharePoint Server 2016

Install Online/Offline prerequisites for SharePoint Server 2016


 Step by step SharePoint 2016 Prerequisites Installation

    Online Installation

1.      Run as Administrator of Prerequisite.exe from installation.

2.      Click on Yes to continue on User Account Control

3.      Click on Next to continue on all lists of the prerequisites for installation.

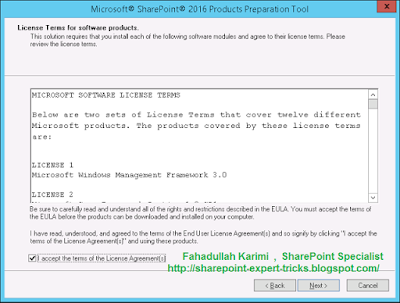
4.      Read then check accept the license terms after that Click on Next to continue


Accept license Aagreement

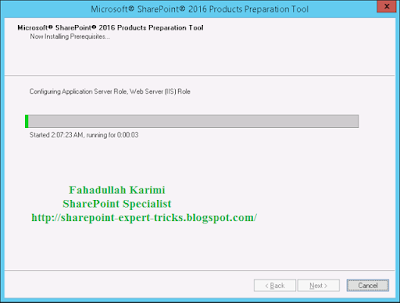
5.      Wait for start installation.


Preparation Tool


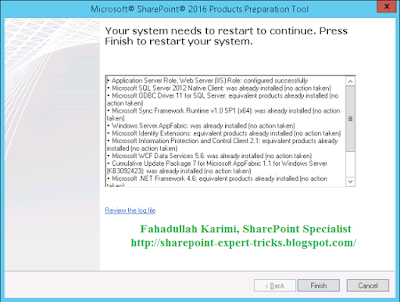
6.      Prerequisites installer takes some time and will prompt for restart. After restart, re-run the prerequisites again! Restart and resume back.


Restart Prompt

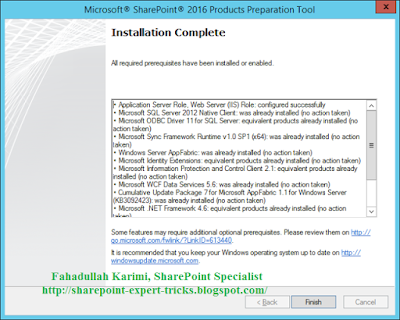
7.      Wait for the installation completed message. Click on "Finish" button to complete prerequisites installation.


Installation Complete


  Offline Installation

We can also download and install it manually by following link:

1.      Application Server Role, Web Server (IIS) Role - These roles can be enabled from the Server Manager.
http://support.microsoft.com/en-us/kb/2765260 for adding and enabling these roles via PowerShell.

2.      Microsoft SQL Server 2012 Native Client - This installs with Microsoft SQL Server 2012 Feature Pack
http://www.microsoft.com/en-us/download/details.aspx?id=29065
. This will include collection of stand-alone packages which provide additional value for Microsoft SQL Server 2012.

3.      Microsoft ODBC Driver 11 for SQL Server - Get this here - This is a DLL containing run-time support for applications using native-code APIs to connect to Microsoft SQL Server and Windows Azure SQL Database -http://www.microsoft.com/en-us/download/details.aspx?id=36434.

4.      Microsoft Sync Framework Runtime v1.0 SP1 (x64) - This is a synchronization platform which enables collaboration and offline scenarios for applications, services, and devices. This service pack is intended to fix a handful of bugs as well as to transition to a public-facing change tracking API that is new in SQL Compact 3.5 SP2 - 
http://www.microsoft.com/en-us/download/details.aspx?id=17616.


5.     
Windows Server AppFabric 1.1 - This is a set of integrated technologies that make it easier to build, scale, and manage Web and composite applications that run on IIS. It provides out-of-the-box capabilities for you to easily build and manage composite applications - 
http://www.microsoft.com/en-us/download/details.aspx?id=27115.

6.      Cumulative Update Package 1 for Microsoft AppFabric 1.1 for Windows Server (KB2671763) - This hotfix package resolves several issues and adds several features that are described here
https://support.microsoft.com/en-us/kb/2671763.

7.      Microsoft Identity Extensions - This enables interoperable federated access to SharePoint 3.0 sites using the WS-Federation standard. It is built using the Windows Identity Foundation and supports use of ADFS 2.0 as an identity provider - http://www.microsoft.com/en-us/download/details.aspx?id=15373.

8.      Microsoft Information Protection and Control Client - The Active Directory Rights Management Services (AD RMS) Client 2.x is software designed for your computers to help protect access to and usage of information flowing through applications that use AD RMS - 
http://go.microsoft.com/fwlink/?LinkID=528177.


9.     
Microsoft WCF Data Services 5.0 - This enables creation and consumption of data services for the Web according to version 3 of the Open Data Protocol (OData), which facilitates data access and change via standard HTTP verbs. WCF Data Services 5.0 includes .NET Framework server and client libraries as well as Silverlight client libraries - 
http://www.microsoft.com/en-us/download/details.aspx?id=29306.

10.  Microsoft WCF Data Services 5.6 - This will update the NuGet packages referenced by the WCF Data Services item templates to version 5.6.3. This installer also makes the code generation for consuming OData V3 endpoints available for all current and future .Net 4.5.X versions - http://www.microsoft.com/en-us/download/details.aspx?id=45308.

11.  Microsoft .NET Framework 4.5.2 - This framework is a highly compatible, in-place update to the previous 4.X frameworks. It can run along with .NET Framework 3.5 SP1 and earlier versions of the .NET Framework -http://support.microsoft.com/en-us/kb/2934520.

12.  Update for Microsoft .NET Framework to disable RC4 in Transport Layer Security (KB2898850) - This resolves a security issue that has been identified that could allow an unauthenticated remote attacker to compromise a system and gain access to information - 
http://www.microsoft.com/en-us/download/details.aspx?id=42883.

13.  Visual C++ Redistributable Package for Visual Studio 2013 - This installs run-time components that are required to run applications that are developed by using Visual Studio 2013 on computers that do not have Visual Studio 2013 installed - http://www.microsoft.com/en-us/download/details.aspx?id=40784.

The installation will take a bit longer and will ask for multiple restarts. Once the server is restarted, you need to run the prerequisites installer again till all necessary components are installed and competed.


Thank you very much

          Fahadullah Karimi

         SharePoint Specialist

Step by step installing and configuring SharePoint Server 2016 on Windows Server 2012 R2 Step by step installation of SharePoint Server 2016

Tuesday, September 13, 2016

Step by step installing and configuring SharePoint Server 2016 on Windows Server 2012 R2


 Step by step installing and configuring SharePoint Server 2016 on Windows Server 2012 R2 which has already SQL Server 2014 installed and configured.

Minimum Hardware Requirements

64 bit processor, 4 Core

12-16 GB RAM

80 GB HDD

Operating System Requirement:

Windows Server 2012 R2 and Windows Server Technical Preview


To clear and cover all the basic steps,I am going to explain in three steps.


   1.      Installing software prerequisites
   2.     Installing SharePoint Server 2016
   3.     Configuring SharePoint Server 2016


Thank you very much

          Fahadullah Karimi

         SharePoint Specialist

Creating simple workflow using SharePoint Designer 2013 Install Online/Offline prerequisites for SharePoint Server 2016

Sunday, September 11, 2016

Creating simple workflow using SharePoint Designer 2013


   Workflows are now important part of any project. We can develop a Microsoft SharePoint Workflow using the available templates, SharePoint designer and Visual Studio. In this post will mainly focus on workflow creation using Microsoft SharePoint Designer.

Workflow created in three ways using Microsoft SharePoint designer:

               1.      List workflow

               2.      Reusable workflow

               3.      Site workflow

 More details  see my previous post

Follow the steps for simple workflow, where current date set in list item through SharePoint designer.

Create a list for SharePoint workflow:

Here, I will create list using UI but you we can also by using SharePoint Designer

    1.    Open the SharePoint site and login.

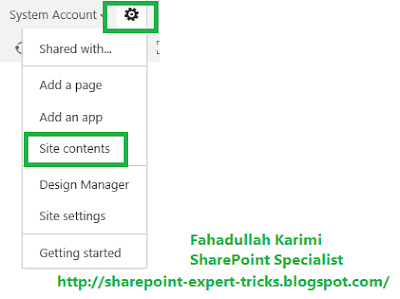
    2.     Go to Site and Click on "Settings" and then click on "site contents" option. 


Site contents


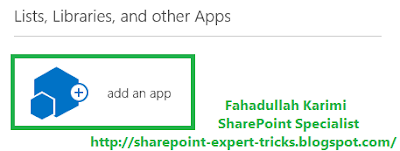
    3.     Click on "add an app".


add an app


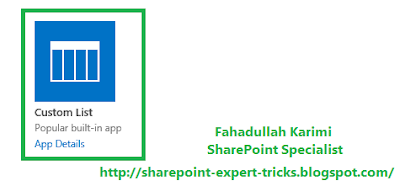
    4.     Select "Custom list" option from the "app" page. It will be popup for open create custom list.

Custom list


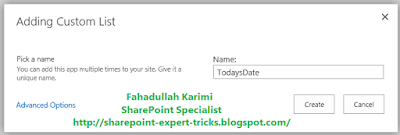
    5.    Provide the name and click on Create.


Adding Custom list


    6. Now custom list created  in the site, we can add as many as need columns with different data type.


New List


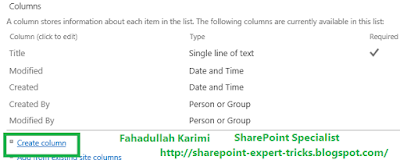
    7.    Now open create custom list and go through list setting and click on “Create column” option and create multiple column with different data type as per need.


Create Column


    8.   I have added Current Date and Description filed in this list.


Create workflow in SharePoint designer:


     1.     Open your SharePoint site in SharePoint designer.


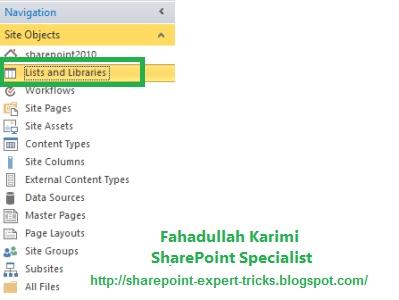
Lists and Libraries


     2.    Click on "List and library" option in Navigation section.SharePoint Designer Lists and Libraries


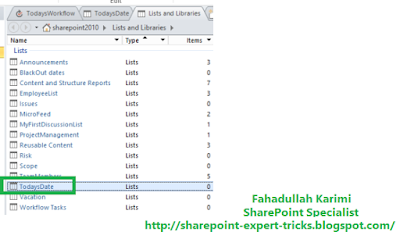
    3.    Select "TodaysDate" List and double click on it, it will open list’s properties.


List Properties


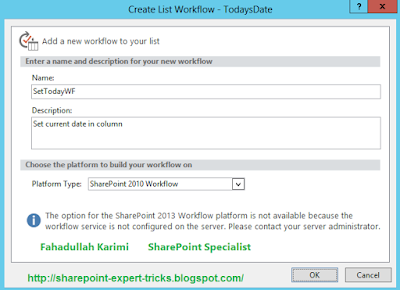
    4.    Now, Click on "List Workflow" in ribbon bar and fill-up workflow information.


List Workflow


    5.    It will open new window for workflow.


Workflow


    6.    Click on "Local Variables" in ribbon bar.


Local Variables


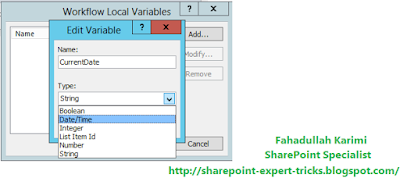
    7.    It will open local variable window, where you can local add variable.


Workflow Local Variables


    8.    Add current date as local variable.


Local Variables


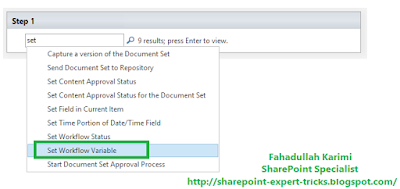
    9.    Now, come on workflow part, write set and just click on search option and select "set Workflow variable".

Set Workflow variable


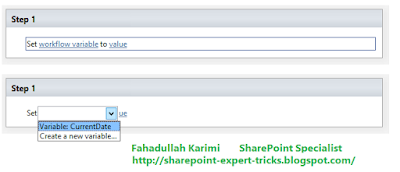
   10.    Now, click on "workflow variable" and select "CurrentDate" option from dropdown.


Workflow variable


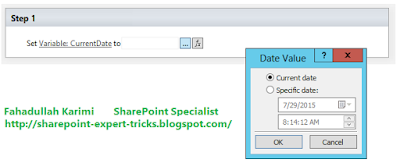
   11.    Now click on value field and set current date option.


variable


   12.    Now select under line option and select.


under line option


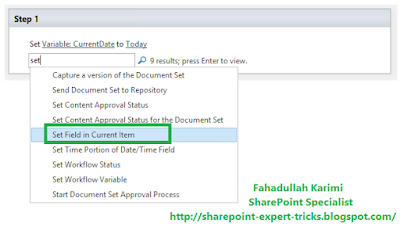
   13.    Select "set Field in current Item".


Field in Current Item


   14.    Now, click on Field item and select "CurrentDate".


Current Date


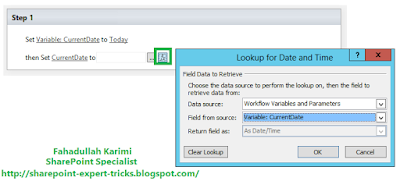
   15.   Now, click on Value filed and click on selected item.it will open one pop-up. You have to select Data source as “Workflow variable and parameters” and Field from source as "current date".


Lookup for Date and Time


  16.   Click on workflow settings in ribbon bar.


workflow settings


  17.   Select "Start workflow automatically when an item is created" option. This option our workflow will be automatically start on while any item is adding.


Start workflow automatically


  18.  Now click on Publish button in the ribbon bar. So our workflow will be publish and its ready to use.


 Microsoft SharePoint Workflow Check


   1.   Open SharePoint site and open TodaysDate custom list.

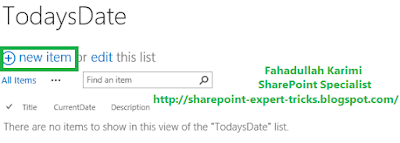
   2.   Click on new item. It will open popup for entering value. You have to just add Title field’s value and click on save button.


New Item

Add Item


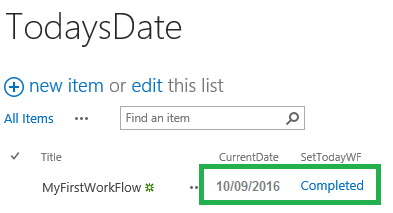
   3.  Now, our workflow will start and it will set current date field’s value and workflow will completed.


Running Workflow


Thank you very much

          Fahadullah Karimi

         SharePoint Specialist

List WorkFlow Vs Reusable WokFlow Vs Site WorkFlow Step by step installing and configuring SharePoint Server 2016 on Windows Server 2012 R2