Saturday, December 10, 2016

Allow anonymous to access Application Page in SharePoint 2013

 In general, use UnsecuredLayoutsPageBase as a base class for pages to which even unauthenticated users must have access, such as a login page. For a page base control to which access can be limited to users who possess certain rights, use LayoutsPageBase.

public class AppPage : LayoutsPageBase

{    

    protected override bool  AllowAnonymousAccess

    {

        get

        {           

            return true;

        }

    }

}

Or Simply

public partial class MyAppPage : UnsecuredLayoutsPageBase

{

    protected void Page_Load(object sender, EventArgs e)

    {

    }

}


Thank you very much

          Fahadullah Karimi

         SharePoint Specialist


Step by step Creating Application page in SharePoint 2013 Using Visual Studio How to fix error "The name ‘InitializeControl’ does not exist in the current context" in Visual Web Part

Monday, December 5, 2016

Step by step Creating Application page in SharePoint 2013 Using Visual Studio

To know About Application page post Application Page in SharePoint 2013 .

 Follow the steps to create application page in SharePoint 2013

1.      Open Visual Studio Run as administrator.

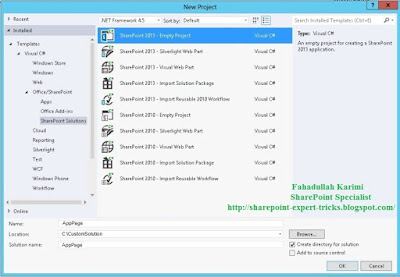
Click on new project select SharePoint solutions under the office/SharePoint from which select project type as SharePoint 2013- Empty Project.

New Project

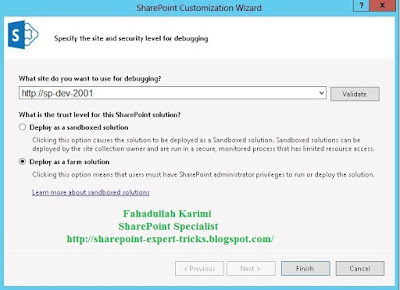
2.      Select the Web Application and Deploy as Farm Solution


Deploy Solution

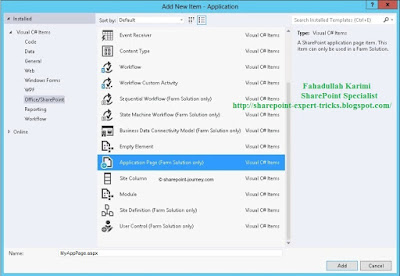
3.      Right Click on Project and Add new Item


4.      Select the Application Page template.


New Application Page

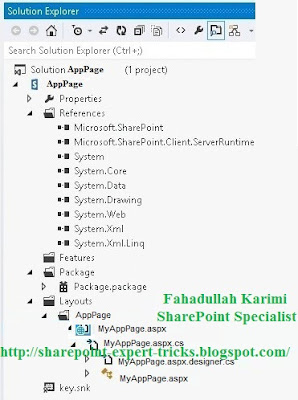
5.      By Default it Creates layout folder automatically and places Application page in that folder.

Solution Explorer

6.      If we navigate to the page using URL Then we can able to see the page as below

7.      The Physical Location of Application is resides in 15

   C:\Program Files\Common Files\Microsoft Shared\Web Server Extensions\15\TEMPLATE\LAYOUTS


Thank you very much

          Fahadullah Karimi

         SharePoint Specialist

Application Page in SharePoint 2013 Allow anonymous to access Application Page in SharePoint 2013

Saturday, December 3, 2016

Application Page in SharePoint 2013

 An application page is a web page that is deployed physically inside the SharePoint Root directory under the following path. C:\Program Files\Common Files\Microsoft Shared\Web Server Extensions\15\.

An application page is different from a site page because it is not available in the content database.

Since application pages are compiled once, so it is faster
Example of Application Pages like settings.aspx, accessdenied.aspx.

An application page is a web page that is used in a SharePoint website. An application page contains content that is merged with a SharePoint Master page. A master page enables application pages to share the same appearance and behavior as other pages on a SharePoint site. We can create application pages in Visual Studio by adding an Application Page item to a SharePoint project. 


To create application page post Step by step Creating Application page in SharePoint 2013 Using Visual Studio


Thank you very much

          Fahadullah Karimi

         SharePoint Specialist

Step by step backup and Restore IIS in SharePoint 2013 Step by step Creating Application page in SharePoint 2013 Using Visual Studio

Friday, November 18, 2016

Step by step backup and Restore IIS in SharePoint 2013

 Backup Steps

Follow the steps

   Open Command Prompt as Administrator.

    Change the directory to C:\Windows\Systems32\inetsrv

 . Run the following command

appcmd add backup IISBackup

This will create backup on location to C:\Windows\Systems32\inetsrv\IISBackup

Restore Steps

Follow the steps

   Open Command Prompt as Administrator.

    Change the directory to C:\Windows\Systems32\inetsrv

 . Run the following command

appcmd restore backup IISBackup


Thank you very much

          Fahadullah Karimi

         SharePoint Specialist

Step by step backup and Restore SharePoint_Config Database in SharePoint 2013 Application Page in SharePoint 2013

Step by step backup and Restore SharePoint_Config Database in SharePoint 2013

  SharePoint_Config database contains data about the following:

·         SharePoint databases

·         Internet Information Services (IIS) web sites

·         Web applications

·         Trusted solutions

·         Web Part packages

·         Site templates

·         Web applications

Restoration of the configuration database by using the built-in backup and restore functionality is not supported in SharePoint products.

If we have not created new web applications or installed solutions then the configuration database can be successfully backed up and restored by using SQL Server or other tools if the SharePoint farm is first taken offline

Method 1.  By using SQL Server Management Studio

Backup Steps

1.      Open SQL Server Management Studio.

2.      Right Click on SharePoint_Config database, and under "Tasks" choose "Back Up"

3.      Select Backup type to "Full" to get a Full backup of database.

4.      Click "Add" to specify where to save the backup file.

5.      On the left-hand side of the window, click on ‘Options‘, and then click on ‘Overwrite all existing backup sets‘.

6.      Click "OK" to start backup.

After successfully completed we will get message that "The backup of database "SharePoint_Config" completed successfully"


Method 2.  By using SQL Query

Backup Steps

1.      Open-->SQL Server Management Studio

2.      Click New Query.

BACKUPDATABASESharePoint_Config
TODISK='C:\Backup\SharePoint_Config.bak'
GO

3.      Click Execute

Method 3.  By using Power Shell

Backup Steps

Backup-SPConfigurationDatabase -DatabaseName SharePoint_Config DatabaseServer DBServerName/Instance -Directory \\server\share\Backup -Verbose

Restore SharePoint_Config Database

Restore - Similar to the configuration database it is not recommended to restore this database except in a disaster recovery scenario because of synchronization concerns.


Thank you very much

          Fahadullah Karimi

         SharePoint Specialist

Step by step backup and Restore Global Assembly Cache (GAC) in SharePoint 2013 Step by step backup and Restore IIS in SharePoint 2013

Step by step backup and Restore Global Assembly Cache (GAC) in SharePoint 2013

We know shared assemblies are stored in the global assembly cache (GAC)

Location of GAC

From .NET Framework 4

Location:C:\Windows\Microsoft.NET\assembly

In earlier versions of the .NET Framework

Location: C:\Windows\\assembly.

Assemblies are shared between all applications on the machine, which is excellent for SharePoint

Versioning is easy because the GAC can hold multiple versions of the same DLL without issues

Backup Steps

1.      Change the View

2.      Open command prompt

3.      Change Directory to Global Assembly Cache Location depend on you .NET Framework

4.      Run the following command to change the view

attrib desktop.ini -h -r -s

rename desktop.ini desktop.ini.bak

5.      Now, Go to Global Assembly Cache Location depend on you .NET Framework and copy the DLL and Past to the Backup folder.

Following types of Folder in GAC

1.      GAC

This folder contains non-native images of DLL used in .NET Framework 1.x. 

2.      GAC_32  

A 32-bit system will only have the GAC_32 directory.  A 64-bit system will have both the directory GAC_32 and GAC_64. These directories contain assemblies that are specific to 32-64 bit mode. 

3.      GAC_MSIL:

The GAC_MSIL cache contains assemblies that can be run in either 32-bit or 64-bit mode. They don’t have any dependency.

4.      NativeImage Framework Version

Native image generated for Framework version. If you have .NET Framework 1.0 and 2.0 both, then there will be two directories.

5.      Temp and Tmp

The folder GAC, GAC_32, GAC_64 and GAC_MSIL contains non-native images of the DLLs. They all contain the MSIL that will be complied into native images and placed in Native

Restore Steps

To restore just Copy the Backup folder and past to GAC


Thank you very much

          Fahadullah Karimi

         SharePoint Specialist

Step by step backup and Restore WSP Custom Web Part\Solutions files in SharePoint 2013 Step by step backup and Restore SharePoint_Config Database in SharePoint 2013

Step by step backup and Restore WSP Custom Web Part\Solutions files in SharePoint 2013

 Method 1.  By using SharePoint central administration

Backup Steps

1.      Central Administration--> Backup and Restore

2.      Click Perform a backup.

3.      Step 1 of 2: Select the Solutions from the list of components

4.      Click Next

5.      Step 2 of 2: Select Backup Type Full

6.      Provide Location path for Backup

7.      Click Start Backup

Restore Steps

1.      Central Administration--> Backup and Restore

2.      Click Restore from a backup

3.      Step 1 of 3: Select Backup to Restore page, from the list of backups

4.      Step 2 of 3: Select Component to Restore page, select the check box that is next to the Solution, and then click Next.

5.      Step 3 of 3: Select Restore Options page, in the Restore Component section

6.      Restore Options section, under Type of Restore, select the Same configuration option

7.      Provide Backup Directory Location path

8.      Click OK

9.      Click Start Restore.

Method 2.  By using  Power Shell

Backup Steps

1. Open SharePoint 2013 Management Shell.

2. Run the following Shell to export all the SharePoint 2013 .WSP File

Add-PSSnapin Microsoft.SharePoint.PowerShell –erroraction SilentlyContinue

 ## set output directory

$dirName = "C:\ BackupSolutions"

Write-Host Exporting solutions to $dirName

foreach ($solution in Get-SPSolution)

{

    $id = $Solution.SolutionID

    $title = $Solution.Name

    $filename = $Solution.SolutionFile.Name

     Write-Host "Exporting ‘$title’ to …\$filename" -nonewline

    try {

        $solution.SolutionFile.SaveAs("$dirName\$filename")

        Write-Host " – done" -foreground green

    }

    catch

    {

        Write-Host " – error : $_" -foreground red

    }

}

Restore Steps

Run the below Power Shell to import/add all the SharePoint 2013 .WSP File

Add-PSSnapin Microsoft.SharePoint.PowerShell –erroraction SilentlyContinue

## set input directory

$dirName = "C:\BackupSolutions"

 Write-Host Importing solutions from $dirName

$fileEntries = [IO.Directory]::GetFiles($dirName);

$list = Get-ChildItem $dirName | where {$_.extension -eq ".wsp"}

foreach($fileName in $fileEntries)

{

    try

    {

        Add-SPSolution -LiteralPath $fileName;

        Write-Host " – done" -foreground green    

    }

    catch

    {

        Write-Host " – error : $_" -foreground red

    }

}


foreach ($s in Get-SPSolution)

{

if(($s -ne $null) -and ($s.ContainsWebApplicationResource))

 {

 Install-SPSolution -Identity $s –AllwebApplications -GACDeployment

 }

 else

 {

 Install-SPSolution -Identity $s -GACDeployment

 }

while ($s.Deployed -eq $false)

 {

     Start-Sleep 2

 }

 }


Thank you very much

          Fahadullah Karimi

         SharePoint Specialist

Step by step backup and Restore Site Collection in SharePoint 2013 Step by step backup and Restore Global Assembly Cache (GAC) in SharePoint 2013